
Best AI tools for image text remover
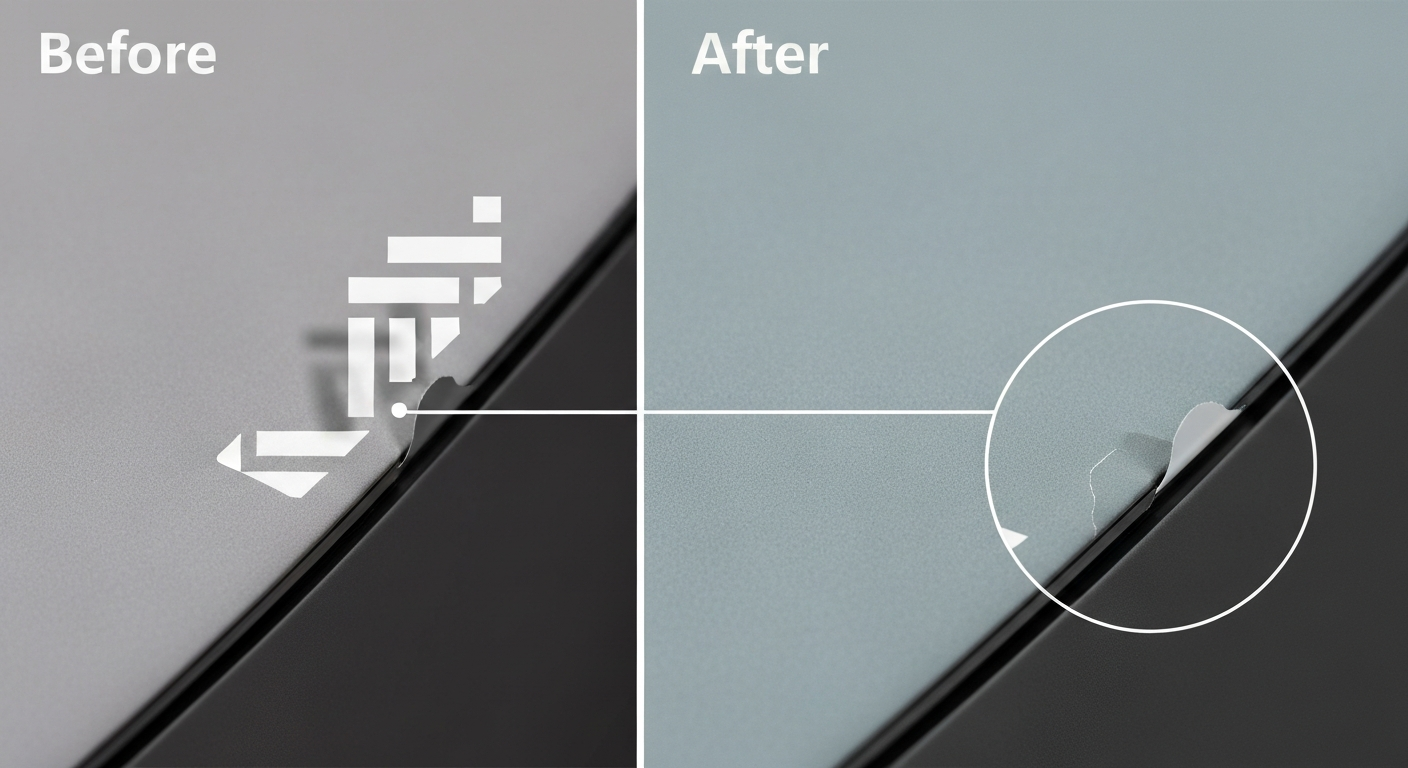
An image text remover that looks perfect in a preview can still fail at 100% zoom. The hard part isn’t deleting letters—it’s rebuilding the pixels underneath so edges stay crisp, textures continue naturally, and lighting doesn’t “jump.”
If you want the fastest fix, you’ll usually start with an ai text remover from image tool. If you retouch for clients, a text remover image workflow with a brush, expand/shrink, and multiple passes matters more than a one-click demo. And if you’re cleaning hundreds of creatives, an ai remover text image pipeline only helps when it fails predictably and sends the hard images to a manual path.
This guide lists practical picks, explains where each image text remover category breaks, and gives you a simple way to evaluate any image text remover before you commit.
Quick routing rule for any image text remover: start with an ai text remover from image for easy overlays, switch to a text remover image brush when edges matter, and only scale into an ai remover text image workflow after you define QA gates and a manual fallback.
Search intent: how people use “image text remover”
Most people use image text remover as the umbrella term. They search ai text remover from image when they want a one-click web or phone edit. They type text remover image when they want brush control and iterative cleanup. They search ai remover text image when they want batch processing, automation, or a local pipeline.
A text remover image search often signals “I need hands-on control,” not just a faster button.
Practical implications when you pick an image text remover:
- If an ai text remover from image looks good only after downscaling, it’s not the right image text remover for product photos.
- If your ai text remover from image leaves halos, switch to a text remover image brush workflow.
- If you need consistent exports, treat your image text remover as a process: mask → fill → QA.
- If you keep iterating on the same backgrounds, formalize a text remover image workflow with presets.
- If you need volume, build an ai remover text image workflow that routes failures into a text remover image editor.
- If you can’t upload files, choose a local image text remover or run an ai remover text image pipeline on your own hardware.
What an image text remover actually does (inpainting + masking)
Most image text remover tools rely on inpainting. You (or the tool) mark the text, and the model generates pixels that match the surrounding context. Traditional fills can patch small gaps; modern AI inpainting can reconstruct larger areas—but it can also hallucinate repeating patterns, smear fine texture, or bend straight edges.
An ai text remover from image tool isn’t a different category of edit—it’s the same inpainting problem with better (or worse) masking, better (or worse) fills, and a faster (or slower) way to iterate.
That’s why the same image text remover can look flawless on a flat wall and look wrong on hair, shadows, gradients, packaging edges, and UI elements. The two levers you control are:
- The mask: how well you cover the full effect (glyphs, outlines, glow, drop shadow, blur).
- Your QA: how you judge artifacts at the final export size.
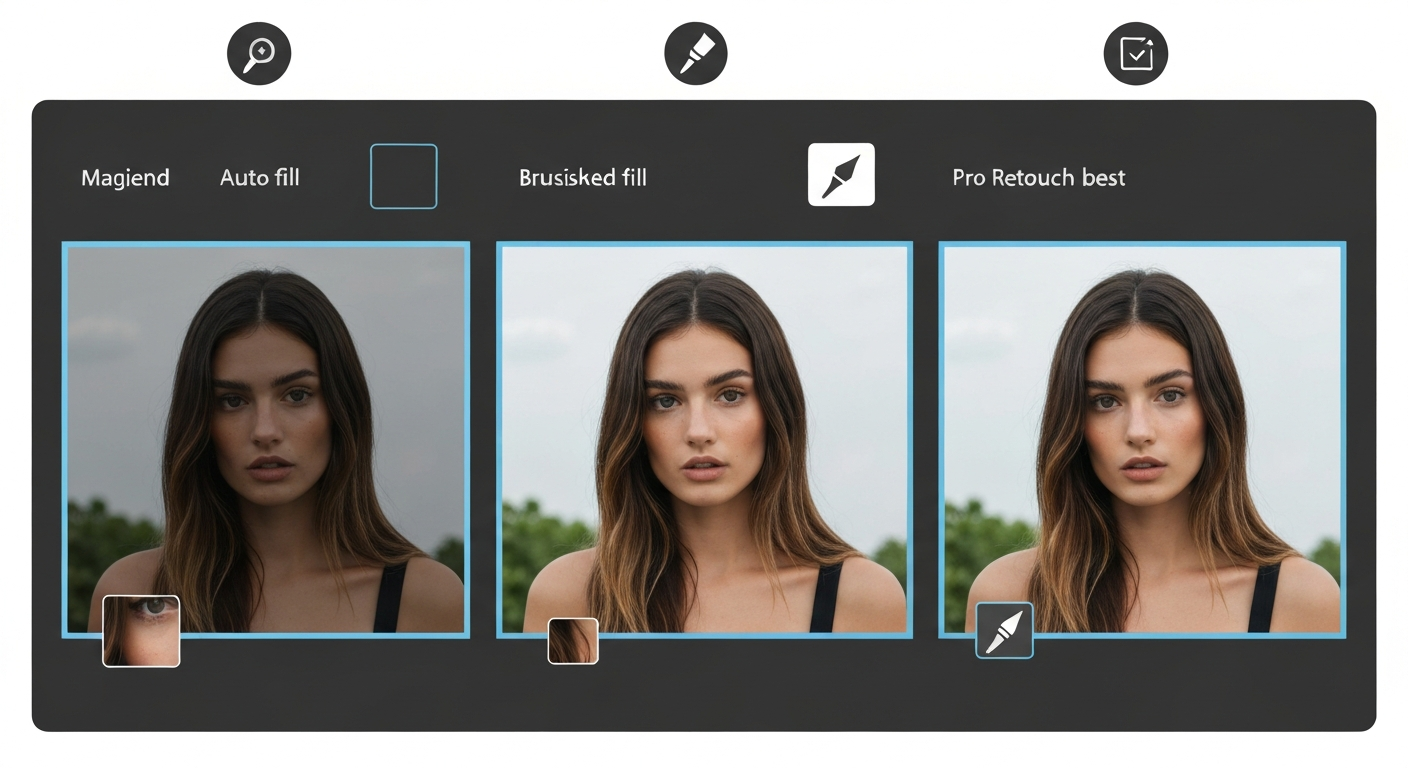
Practical rule: treat auto fill as the first pass. Your image text remover results improve most from small mask tweaks, 2–4 reruns, and quick cleanup.
When not to use an image text remover (rights + redaction)
Before you use an image text remover, be clear about intent:
- Watermarks and ownership marks: removing them can violate rights or platform rules. If you don’t have permission, don’t use an image text remover for that.
- Security/redaction: an ai text remover from image tool is not redaction. If you must hide sensitive info, use solid overlays and flatten exports.
- Brand/legal text: for product claims, disclaimers, and regulated content, re-export from the source file instead of using a text remover image workaround.
What to look for in any image text remover (quality + workflow)
Use this checklist to choose a tool that matches your images and your tolerance for rework:
- Mask control: auto-detect is convenient, but a good image text remover gives you brush/expand/shrink tools to protect edges and include drop shadows.
- Effect coverage: text often has strokes, glow, blur, or semi-transparency. If your image text remover removes only solid glyphs, you’ll still see residue.
- Texture continuity: brick, fabric, skin, and skies expose weak fills fast. Check whether the image text remover repeats patterns, smudges detail, or over-smooths.
- Resolution and export limits: many ai text remover from image web tools downscale exports; test at your real output size.
- Iteration speed: the best image text remover results often come from 2–4 attempts with slightly different masks in a text remover image workflow.
- Batch and repeatability: if you plan an ai remover text image workflow, presets and consistent outputs matter more than one spectacular demo edit.
- Privacy and licensing: upload-based image text remover tools may be a deal-breaker for sensitive images, and removal isn’t a license to erase ownership marks.
Before you settle on an image text remover, build a tiny test set that matches your real work:
- One flat background: solid wall, sky gradient, studio sweep.
- One edge-heavy image: hair, product outline, UI border, thin lines.
- One texture-heavy image: fabric, brick, grass, wood grain.
Run every ai text remover from image tool on the same three images and judge at 100% zoom. If the tool only looks “clean” after downscaling, that image text remover is hiding artifacts.
Save that three-image set as your text remover image benchmark and rerun it every time you swap to a new image text remover or update an ai remover text image workflow.
Best AI tools for image text remover (by workflow)
Rather than a single “winner,” here are practical picks by workflow.
1) One-click web tools (fast image text remover results)
These are the quickest way to test a removal. They’re great when the overlay is obvious and the background is forgiving.
What to expect: a one-click ai text remover from image tool usually does well on flat backgrounds and struggles on edges, shadows, and patterns.
Common picks to try:
- Pixelbin
- Clipdrop (text/object cleanup)
- Cleanup-style browser tools: SnapEdit, Pixlr, Fotor, Cutout.pro, PicWish
If you only need a quick draft, any image text remover in this category can be enough—just confirm export size and edge quality.
How to evaluate an ai text remover from image tool in five minutes:
- Test one edge-heavy photo (hair, product outline, UI border).
- Test one texture-heavy photo (fabric, brick, grass).
- Export at the same resolution each time, then inspect the edited area at 100% zoom.
For simple social graphics, a quick ai text remover from image is often enough. For product photos and UI, treat a one-click result as a draft: if the edge looks wobbly or texture repeats, your image text remover is guessing—tighten the mask and retry or move up a tier.
If a web tool only looks “clean” after downscaling, it’s not the right choice for high-resolution assets.
Quick checks that catch most failures in an ai text remover from image result:
- Zoom to 100% and 200% around the edit (don’t judge the global preview).
- Look for halos where the text was semi-transparent.
- Watch for warped straight lines (UI borders, packaging edges) that give away an image text remover.
ai text remover from image: 9 quick fixes when results look wrong
- ai text remover from image exports may be downscaled—match your target size first.
- ai text remover from image masking can miss shadows—expand the mask to include glow and blur.
- ai text remover from image edges can warp—shrink the mask away from borders and rerun.
- ai text remover from image textures can smear—try a tighter selection and two reruns.
- ai text remover from image patterns can repeat—do two smaller removals instead of one large one.
- ai text remover from image fills can look too smooth—match grain/noise before exporting.
- ai text remover from image gradients can band—finish in a pro image text remover when needed.
- ai text remover from image batches can drift—switch to an ai remover text image workflow with QA gates.
- ai text remover from image consistency improves with control—use a text remover image brush for finals.
If an ai text remover from image keeps failing on the same edge-heavy files, switch to a brush-based image text remover workflow instead of rerunning endlessly.
An ai text remover from image is best for drafts; a high-control image text remover is best for finals.
2) Brush-first text remover image tools (manual control)
When the overlay crosses detail, manual masking wins.
A text remover image brush is especially useful for outlined or shadowed lettering, where auto-detect tends to leave halos.
If you need the cleanest image text remover output on textures and edges, brush-first tools usually beat one-click results.
Good options in this category:
- Cleanup.pictures: paint over text and iterate until texture looks natural.
- Inpaint-style apps: useful when you want a dedicated text remover image workflow with repeatable selections.
Tip: with a brush tool, smaller masks usually beat big ones. Remove a little, check, then expand.
If you edit batches, save a couple of presets in your text remover image tool (brush size, feather, expand) so results stay consistent.
When a one-click ai text remover from image leaves halos or smears texture, a text remover image brush pass is often faster than trying five different web tools.
3) Design suites (image text remover + layout in one place)
- Canva: handy when removal is one step in a marketing workflow.
- Adobe Express: lightweight web editor that fits “edit and publish” pipelines.
These can be a good fit for thumbnails and social assets, especially if you’re already in the same canvas.
If your job is “remove the overlay and keep designing,” a design-suite image text remover can be the most efficient text remover image workflow.
4) Pro editors (best image text remover control for hard cases)
- Adobe Photoshop: the precision option when the result must survive close inspection. Combine AI fills with clone/heal for final polish.
For image text remover work that must be perfect, Photoshop often saves time overall—because you can iterate on a separate layer, refine the selection, and fall back to manual retouching when the fill is wrong.
If you already run a text remover image workflow, Photoshop adds reliable last-mile tools when the fill is close but not clean.
A pro image text remover workflow is slower per file, but faster the moment auto-fill starts bending lines or smearing texture.
When a web image text remover starts bending straight lines, Photoshop is the fastest escape hatch.
5) Mobile tools (a fast ai text remover from image on your phone)
Phone-native edits are convenient, but results vary by image type and export path. Use them for quick drafts, then re-check on a desktop if quality matters.
- Google Photos (Magic Editor / Magic Eraser-style features): strong for quick removals and suggestions; validate carefully for professional assets.
- Apple Photos (Clean Up): convenient for removing distractions directly in your library; still do a 100% zoom QA pass.
Treat phone edits as an ai text remover from image draft: great for speed, but not always a consistent image text remover for brand or print assets.
6) Local and automated workflows (ai remover text image at scale, no uploads)
If you can’t upload images, local inpainting is a viable route. An ai remover text image setup can run on your hardware and keep files in your own storage.
The trade-offs: more setup, fewer guardrails, and more responsibility for QA. For teams, a pipeline works best when it outputs “good enough” edits for easy images and flags the rest for manual review.
An ai remover text image pipeline that actually helps (instead of creating rework) usually includes:
- ai remover text image inputs: normalize resolution, crop rules, and output format so results compare cleanly.
- ai remover text image masking: define how masks are created (auto-detect, manual markup, or templates) and how they expand to include shadows/outline.
- ai remover text image QA gates: measure edge wobble, texture repetition, and blur; fail fast when the image text remover output is suspicious.
- ai remover text image fallback: route failed items into a text remover image editor (brush workflow or pro editor) without losing context.
- ai remover text image tracking: log failures by background type so you can tune masks, tiers, and routing over time.
Without those guardrails, an ai remover text image workflow becomes a manual cleanup treadmill.
If you’re standardizing an ai remover text image workflow, keep one “gold standard” image text remover available for the difficult manual fixes.
Quick picker: match the image text remover to the job
- Simple captions on clean backgrounds: a one-click ai text remover from image is usually enough.
- Text crosses edges (product outlines, hair, UI borders): use a text remover image brush workflow, or a pro image text remover when quality matters.
- Patterns and gradients: pick an image text remover with mask refinement and fast reruns; expect 2–4 passes.
- Dozens of assets: run an ai remover text image batch, then route failures into a text remover image editor.
- Sensitive images: prefer a local ai remover text image workflow or an on-device image text remover with clear data handling.
Comparison: one-click vs brush masking vs pro editing vs ai remover text image pipelines
Most options fall into four buckets. Use the bucket that matches how you’ll handle failures.
One-click auto tools
- Best for: obvious overlays on simple backgrounds
- Strength: speed and low effort
- Weak spot: edges, shadows, semi-transparent text, patterned surfaces
Brush masking (manual retouching)
- Best for: textured backgrounds and careful edge work
- Strength: control over the mask and the filled region
- Weak spot: slower; needs basic retouching judgment
Pro editors (precision workflows)
- Best for: e-commerce, UI screenshots, print, brand assets
- Strength: combines AI fills with manual tools for clean finishes
- Weak spot: time and learning curve
Pipelines and APIs (ai remover text image at scale)
- Best for: teams removing the same overlay across many images
- Strength: consistency and throughput
- Weak spot: hard images still need a manual path
An ai remover text image pipeline is only worth it if it reduces manual touch time and makes failures obvious.
Treat every ai remover text image output as a draft until it passes your QA gates.
A simple routing rule helps: let the automated step handle flat backgrounds and large, simple overlays; escalate edge-heavy images to a full editor.
Mini case scenarios (how teams use an image text remover in practice)
Case 1: E-commerce promos across 60 product photos
A merch team needs to remove “SALE 20%” badges from last month’s images. They start with an ai remover text image web tool for speed. It works on half the set, but fails where badges overlap textured packaging.
Practical approach:
- Run an ai remover text image batch for the easy images.
- Spot-check the ai text remover from image outputs early to catch downscaling and blur.
- Route edge-heavy images to a manual text remover image workflow.
- Track common failures (halos on gradients, warped edges) and add checks to your routing.
- QA every image text remover result at 100% zoom on a sample plus every image with thin lines or gradients.
If your image text remover introduces halos on gradients, mark those files for manual cleanup.
Here, the “best” option is the one that fails safely: it’s easy to re-mask and rerun without creating new artifacts.
Case 2: UI screenshots with timestamps and overlays
A product team wants clean UI screenshots for documentation. A quick removal step deletes the timestamp, but introduces a halo on the app header gradient.
Practical approach:
- Use a precision editor and keep the mask tight.
- Generate a few fill variations.
- Finish with a light clone/heal pass to restore gradient smoothness.
Step-by-step framework: a repeatable text remover image workflow
Use this process whether you’re using a browser tool, a full editor, or automation.
The goal is the same for any image text remover: the edit should disappear at your final export size.
In a text remover image workflow, take a second pass on shadows and outlines before you call the job “done.”
- Inspect the overlay: solid text, outlined text, shadowed text, semi-transparent text all need different masks.
- Pick the right tier: start with an ai text remover from image for easy backgrounds, switch to a text remover image brush for edges, and reserve an ai remover text image workflow for batches.
- Mask the full effect in your text remover image workflow: include outlines and shadows, not just the solid letters.
- Generate multiple fills: pick the best texture match, not the smoothest patch.
- Fix edge artifacts: tighten the mask around borders and rerun if you see warping.
- Match grain and compression: a too-clean fill looks fake on noisy photos.
- Validate your image text remover output at final size: check at 100% zoom and at the export resolution you’ll publish.
- Lock exports: export once in the target format to avoid extra compression damage.
Practical checklist: before you export a text remover image result
- Does your image text remover fill match surrounding grain/noise?
- Are straight lines still straight (especially in UI screenshots) after the image text remover pass?
- Any halos left from semi-transparent text or drop shadows that the image text remover didn’t include in the mask?
- Do gradients stay smooth (no banding or blotches) in the image text remover output?
- Do nearby edges stay natural (no warping or wobble) after you rerun the image text remover?
- Did the text remover image workflow miss small characters or punctuation?
- Are output dimensions consistent across a batch (especially in an ai remover text image workflow)?
FAQs
Is an image text remover the same as a watermark remover?
The tools can overlap, but the intent matters. An image text remover is meant for cleaning visible overlays and reconstructing the background. For ownership marks, get permission before removing them.
Why does an ai text remover from image leave a blurry patch?
Common causes are downscaled exports, heavy JPEG compression, or a fill model that can’t rebuild fine texture. Try exporting at full resolution, tighten the mask, and rerun. If you still see smudging, switch to a text remover image tool with manual control.
Can a text remover image tool handle patterned fabric or brick walls?
Yes, but it’s the hardest case. Auto-detect tends to struggle. A manual brush workflow with a few fill attempts usually produces the most believable result.
How do I remove text from lots of images consistently?
Use an ai remover text image workflow with batch support plus QA gates: normalize size, spot-check at 100% zoom, and route hard images to a full editor. Keep one strong image text remover available for the manual fixes.
Is it safe to use an ai remover text image tool for redaction?
No. If you need to hide sensitive information, use real redaction (solid overlays and flattened exports). Text removal is for visual cleanup, not security.
Should I build an ai remover text image pipeline or use a text remover image editor?
Use a text remover image editor when quality is the priority and the set is small enough to handle manually. Build an ai remover text image pipeline when volume is the priority and you can define strict QA gates, clear failure routing, and at least one “gold standard” image text remover for the difficult cases.
Start simple: one image text remover for hard cases, and one ai remover text image workflow for the easy cases.
If you want a simple way to test removals on real overlays and see results at full size, try an online image text remover on one image first, then use the framework above before you run a full batch.